Pages

Tuesday 21 June 2011

Snickers centered Blondie

Blondies have been on my "to make" list for a while now, as I love brown sugar. One of Mr X's favourite chocolate bars is a snickers, so I decided to create a two layer blondie with a caramel snickers filling.

This recipe is easy and comes together pretty quickly. I was originally going to just use one batch of the blondie recipe, spread half out in the baking pan, add a layer of caramel snickers sauce, then top it with the remaining mixture. I realised pretty quickly that it wouldn't work though - the recipe did not make as much mixture as I had anticipated! So (panicking), I popped the first blondie in the oven and while that was baking I whipped up a second one.

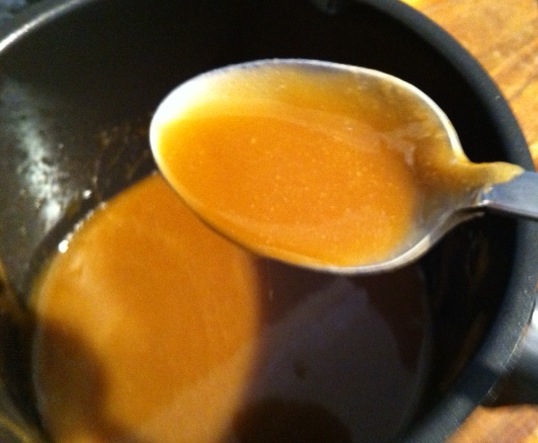
The caramel when cooking smelt amazing... It was very tempting to just eat spoonfuls of it straight out of the saucepan...
Ingredients:
Caramel snickers sauce
1/4 cup butter
1/2 cup firmly packed brown sugar
1/8 cup milk
3/4 tsp vanilla extract
6 fun sized snickers, chopped

Blondie (Recipe from Simply Recipes - I doubled original recipe. Single blondie ingredients below)
1/2 cup of butter, melted
1 cup of tightly packed dark brown sugar
1 egg, lightly beaten
1 teaspoon of vanilla
1/2 teaspoon baking powder
1/8 teaspoon of baking soda
1 cup of all-purpose flour
1/3 cup of chocolate chips

Method:
Caramel snickers sauce
Over medium heat, melt butter in a small sauce pan. Allow to simmer, then add in the brown sugar, stirring, and bring to boil. Then lower heat and stir until sugar is dissolved (should take about a minute). Stir in milk, bring to boil, then remove from heat and stir in the vanilla. 
Leave to cool for 5-10 minutes, then mix in half the snickers and stir well (they will melt a little). Leave to cool down while you make the first blondie, then add the remaining snickers and mix).

Blondie
Preheat the oven to 176°C. Brush 20cm square pan with melted butter and a sprinkling of flour. 
Beat melted butter and brown sugar in a bowl until fluffy.
Add a lightly whisked egg and vanilla extract and beat to combine.
Add in flour, baking soda, baking powder and mix until just combined. Add the chocolate and mix.
Pour into pan and spread evenly.

Bake for 20-25 minutes or until set in middle but still soft (it will firm up on cooling). 

Leave to cool for 10 minutes, then tip onto a plate. While still warm, spread caramel snickers sauce over top.

Bake the second blondie. Once cooled, carefully remove from pan and place carefully on top of first blondie. This is where I went wrong. Mr X had organised for us to go to the pub for drinks and I was fast running out of time. So, in my haste, this happened....


Friday 17 June 2011

Cake bites ... what a mess!


Inspired by Bakerella's super cute cake balls and cake pops, I decided I had to attempt them! Most Monday's Mr X takes my baking leftovers to work - but it is a public holiday in Melbourne today (yay!) so I baked these.

This is my first attempt at cake bites. I'm making them with banana cake, but the possibilities are endless. Next time I think I'll try chocolate or a vanilla cake. Or maybe a combination of the two...

Most cake pop / ball / bites that are featured up on various blogs tend to use a cake mix, but I don't like using them so I made my own cake.


Ingredients:

Cake ingredients (Minus the cinnamon, and I upped the vanilla to 1tsp) 


Nutella icing
1/3 cup nutella, softened
1/3 cup icing sugar, sifted
2 tbs unsalted butter
less than 1/3 cup milk


Step 1# Bake cake and let it cool completely.
Step 2# Make icing (you will need between 1/3 to 2/3 cup of icing for this, depending on how big your cake is). I used about a 1/2 cup.
Step 3# Crumble cake up into a large bowl with or hands, or in the food processor.
Step 4# Mix 1/3 cup icing into the crumbled cake.


Although messy, I think it is easiest to mix with your hands until thoroughly combined. You want to achieve a texture similar to the centre of a truffle. Mix in additional icing if necessary. Basically, you just want enough icing added so that the cake crumbs are bound when you roll them into balls. What you don't want is to add so much icing that the mixture becomes mushy and wet.
Step 5# Pop mixture in the fridge for an hour or so to harden, this will make step 6 easier! Or if you want, skip this step and go straight to 6.

Step 6# Roll mixture into bite sized balls. I used a rounded tbsp of mixture per ball, and place them on a plate or tray lined with baking paper. At this stage I couldn't resist drizzling extra nutella over them....

Step 7# Pop into freezer for an hour
Step 8# Melt chocolate in a microwave safe bowl on medium, checking frequently to stir. Be careful not to burn!
Step 9# Dip balls into chocolate. This is the hardest part, and you can see from the photos that I was not awesome at it! In fact, I was terrible. I used a couple of toothpicks.


Using a toothpick, pick up a balls and dip in the chocolate. Using a second toothpick in the other hand help the ball slid off the toothpick. Lightly tap off excess chocolate. Leave to set. 


Step 10# Eat.


Wednesday 8 June 2011

Peanut butter Quinoa

For those of you that know me well, I am obsessed with peanut butter. So much so that I actually put lots of it in a bowl, microwave it, and eat it with a spoon. Mmmmmmmmm. So unbelievably good. I eat so much of it that I thought I should try natural peanut butter, because it's better for you, right? It was ok, but I prefer the normal, processed peanut butter (full of salt and sugar), so I switched back.

Now I have developed a new obsession - Quinoa. Quinoa (pronounced Keen-wah)


Quinoa information...(pronounced Keen-wah)

  • It has a nutty sort of flavour
  • It looks like a grain, but its actually a seed
  • You can get different varieties and colours. The most common colour is white, and that is the only one I have tried. But apparently there are also red and black.
  • It can be used as a breakfast cereal, as a substitute for couscous or rice, or in baked goods
  • It's gluten-free
  • It's high protein, and a source of all 8 essential amino acids, low GI and rates pretty well in terms of fibre and iron
  • And.... It's actually yummy.

Anyway, so I decided to combine my two obsessions into a (probably slightly odd) meal - I just mixed the two of them together.

Ingredients:
1/2 cup quinoa
2 tablespoons peanut butter (I use smooth, but any will do)

Method:
Cook quinoa according to the packet instructions - one part quinoa to two parts water. I actually have a microwave safe rice cooking bowl that I pop the quinoa and water in, then stick it in the microwave on the rice setting, and it cooks it perfectly.

Once thats cooked, set aside.

Place the peanut butter in a microwave safe bowl, and microwave on medium low for 50 seconds, or until runny (be careful not to burn it!)

Mix in quinoa, and eat!

Note - for a "savoury" twist, I add soy sauce.

Next step - peanut butter quinoa cookies. Oh yeah!

Tuesday 7 June 2011

Spiced steak salad

This is such an easy meal to put together, and meets Mr X's requirement of a low carb dinner. I cheated using a curry paste, but you could easily make your own. A homemade curry paste will make it even better.


Serves 2.


Ingredients:
400g steak of your choice
1 1/2 tbsp curry paste (I used massaman)
2 tbsp freshly squeezed lime juice, + extra
1/2 long red chilli, finely diced (optional)
1/2 a red onion, chopped


Salad
3 cups mixed salad leaves
1 punnet cherry tomatoes
1 cup cucumber
1 carrot, finely chopped into small matchsticks
Handful of snow peas, ends removed
1/2 avocado, peeled and diced
Cheese (optional - Mr X likes cheese on everything...) or corriander, to taste.


Method:
Mix the curry paste, chilli and lime in a bowl, and add steak to it. Place in fridge for 30 minutes, or overnight to marinate.


Cut up the salad ingredients (minus the cheese or corriander) and divide onto plates.


Heat a pan over medium heat, lightly spray with oil and add onion, stirring, ensuring they don't burn, until cooked. Sprinkle over salads. Turn heat up to medium high, lightly spray pan with oil and add the steak. Cook as desired (I cooked ours medium rare), then slice and place on top of salad. Sprinkle with cheese or corriander. Enjoy!

Saturday 4 June 2011

Full-of-cookie cupcakes


A cupcake with a cookie baked into it, topped with icing and decorated with a mini cookie. Sounds cute, right? Two of my favourite things combined into one delicious treat. Cookies and cupcakes = winning combination. That was the plan, anyway!

A few food bloggers have posted similar recipes so I did a bit of research. I wanted to use eggless cookie dough for the centre of the cupcake, as the dough doesn't really cook through during the cupcake baking process. I didn't want to risk anyone getting sick!

So, inspired by the Paris Pastry blog, here is my variation.

Ingredients:

Cookies

1/2 cup butter, softened
1/2 cup brown sugar
1 cup flour
4 tablespoons milk
1 1/2 tsp vanilla extract
2/3 cup miniature chocolate chips (I used 1/3 dairy milk, 1/3 top deck)

Cupcakes
1 1/2 cups plain flour
1 teaspoon baking powder
1/2 teaspoon salt
1/2 cup unsalted butter, softened
1 cup firmly packed brown sugar
2 large eggs
1/2 cup buttermilk

Chocolate buttercream icing
125g butter (at room temperature)
1/4 cup cocoa
2 1/2 cups icing sugar
2 tbs milk

Method:
Cookies
Beat the butter and brown sugar together in a bowl until light and fluffy. Add the water and vanilla and beat well. Add flour and salt a bit at a time, mixing in between.
Stir the chocolate chips into the batter.

Refrigerate for at least 30 minutes so it firms up and is easier to handle.

Remove from refrigerator. Line a cookie tray with baking paper and roll out cookie dough into 1 tbsp sized balls. Set aside 20 to go into the cupcakes. Bake the remaining cookies for 5-7 minutes, or until lightly browned on top. Allow to cool.

Cupcakes
Preheat the oven to 170C, grease and line 20 capacity cupcake pan(s).

Beat the butter and brown sugar together in a large bowl, until light and fluffy. Add the eggs one at a time, beating mixture in between for approximately 30 seconds.

In a seperate bowl, sift flour, baking powder and salt.

Add half the flour mixture and half the buttermilk to the butter, sugar, and egg mixture. Beat until just combined. Repeat process with the remaining flour and buttermilk. Don't overbeat.

Fill the cupcake liners 1/2 full.

Put a cookie dough ball in the middle.

Bake for 15 - 18 minutes, until lightly browned on top.

Chocolate buttercream icing
Place butter in a large mixing bowl. Use an electric beater to beat for 2 minutes or until light and fluffy.
Add the icing sugar and cocoa gradually, and beat until the mixture is fluffy. Add the milk one tablespoon at a time and beat until you are happy with the consistency.

To decorate:

Lightly spread a tablespoon of frosting on top of cupcake. Top with a cookie, and serve.

Wednesday 1 June 2011

Eggplant and mushroom curry

I love spiced eggplant. My Mum makes a great baked eggplant dish, which she refers to as a "Moussaka". I don't think it is a moussaka in the traditional sense - over time, she has made it hot and spicy, it really is a fabulous dish. It's like comfort food for me - I find myself disappointed if I go to my parents house for dinner and it is not on the menu. The below recipe is different altogether to Mum's eggplant dish, but incorporates the same main ingredients - eggplant, mushrooms, tomatoes and chilli.

Ingredients:
2 medium eggplants 

8 button mushrooms, sliced
1 tablespoon olive oil
1 medium onion, finely chopped
1 medium red chili, finely chopped (seeds in or removed, depending on taste - I kept mine in)
1 400g can diced tomatoes, with liquid
1-2 tablesoons garam masala or curry powder (to taste)
1 teaspoon ground cumin
1/2 teaspoon mustard powder

1 tsp grated ginger
1 heaped tbs crushed garlic (I roasted mine first)
Large handful of spinach
salt to taste
Corriander, finely chopped, to taste (1 used 3-4 tablespoons)

Method:
Preheat oven to 220 degrees C.
Prick the skin of the eggplants all over. Place on a lined baking tray and pop in the oven. Bake for 30 to 40 minutes, or until the eggplants have collapsed. Remove from the oven and leave to cool. When cool enough to handle, peel the skin and chop up the flesh. S
et aside. Discard the skin and stems. 
Heat oil in a medium-sized heat proof casserole dish over medium heat and sautee onions until golden, before adding the chilli and mushrooms, continuing to cook for another minute or two. 
Add the diced tomatoes and spices. Stir for another minute before adding the eggplant.
Reduce oven to 200 degrees C. Place casserole dish in oven. Bake for 15-20 minutes. With about 5 minutes to go, stir in spinach leaves. When ready, remove from oven, sprinkle with corriander before serving.


Serve with another curry dish, such as Saag Lamb or on its own as a vegetarian meal with rice or quinoa.

Shoeboxgirl