Pages

Saturday, 26 November 2011

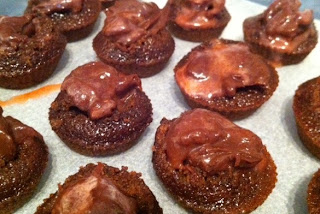
Seriously good brownies....with caramello chocolate

There is something wonderfully tempting about a gooey, chocolately brownie. They are not the most attractive of baked goods, and are definitely not neat and pretty like a cupcake. But seriously.... to me at least, the gooier the brownie looks, the better. The brownies have a lovely shiny top due to heating of the sugar/butter mixture for a second time (and ultimately dissolving more of the sugar).

These are good just the way they are, but also easily adaptable. Add-ins are only limited by your imagination.

This recipe is adapted from Beantown Baker, but originally came from a US flour company.

Ingredients:
1 cup unsalted butter
2 cups white sugar
1/4 cup brown sugar
4 large eggs
1 1/4 cups cocoa
Sprinkle of salt
1 tsp baking powder
1 tbsp vanilla bean paste
1 1/2 cups plain flour
1/2 cup dark chocolate pieces
1/2 cup milk chocolate pieces
1 cup caramel chocolate pieces

Method:

Preheat the oven to 176 degrees C. Grease and line a 22cm x 33 baking pan (approx).

Melt the butter in a small saucepan over low heat. Remove from the heat and mix in the sugar until combined. Return the pan to the heat just until the mixture is hot, but you don't want it to bubble. Stir continuously - it should look lovely and glossy.

Pop the butter/sugar mixture to a large mixing bowl. Add the cocoa, salt, baking powder and vanilla. Add in the eggs, mixing until smooth.

Mix in the flour and chocolate, stirring until combined. Be careful not to over mix.

Pour the batter into the prepared pan and bake for approx 25-30 minutes, until the brownie edges are set and firm but the centre is still a little gooey (not uncooked though!).

Remove from the oven and allow to cool in the pan for 10 to 15 minutes.  Carefully remove from pan and allow to cool further. If you can resist, leave to cool completely for easier cutting.


Chocolate and caramel slice

This recipe is from Exclusively food, a great website with many tempting recipes that I wish to try. This recipe has been calling to me for a while - I love caramel. I cannot begin to describe how amazing the base smelt while baking... the irresistible combination of butter, brown sugar and coconut. 
While the recipe is a three step process, it is a really easy slice to make with great results. Everyone loves this slice.

Ingredients:


Base
1/2 cup brown sugar, firmly packed
2/3 cup desiccated coconut
2/3 cup self-raising flour
85g butter, melted

Caramel centre
30g butter
2 tablespoons golden syrup
1 can sweetened condensed milk
 

Chocolate topping
150g milk or dark chocolate
1 tsp oil

Method:
Preheat oven to 160 degrees Celsius (fan-forced). Grease and line a 20cm square cake pan. I like to create an overhang with the baking paper to ensure easy removal of the slice from the pan once baked.

Base
Add the brown sugar, coconut, and flour in a large bowl and stir lightly until well combined. Add in the melted butter and stir to combine before pressing the mixture into prepared pan - a back of a spoon or your fingertips are the easiest ways.

Pop in the oven and bake for 10-12 minutes, or until lightly golden on outside and slightly puffed in the centre.

Set it aside to cool while you make the caramel.

Caramel filling
You can do the caramel a couple of ways, either in a saucepan or in the microwave.

Saucepan - Over medium heat add butter and golden syrup to a small heavy-based saucepan and stir occasionally. Add the condensed milk once the butter has melted and stir continuously for about 10-12 minutes. Mine was done it 10 - is is ready when the caramel has thickened.

Carefully spread this over the base and put it back in the oven for 10-12 minutes. Again, mine was done in 10. It is done when the caramel has darkened around the outside, forming a 1/2 cm frame.

Leave to cool.

Chocolate topping
Chop the chocolate into small pieces and put in a microwave safe bowl. Microwave on medium for a minute. Check and stir. Microwave in 30 bursts on medium until melted. Be careful not to burn it. Stir in oil. The oil makes the chocolate easier to slice through once set.


Monday, 14 November 2011

Double the apple - Apple cake with apple filling

My Dad has been helping us a lot lately in our search for a new house. So as one way to say thank you, I baked him an apple cake.


Ingredients:
Cake (Adapted from Simply Recipes)
1/2 cup unsalted butter, room temperature
2 cups plain flour
1 tsp baking soda
1 tsp cinnamon
1/2 teaspoon ground allspice
Pinch salt
1 cup sugar (I used 3/4 white, one quarter brown)
3 large eggs
1 teaspoon vanilla bean paste
1 cup apple sauce (plus extra to fill the cake) - recipe here is enough for the cake plus filling.
1/4 cup buttermilk


Method:
Preheat oven to 190 degrees C. Greese and line a 20 x 20 cm square baking pan.
Sift the flour, baking soda, cinnamon, allspice and salt into a large bowl and set aside.
Place the butter in another bowl and beat until pale, add sugar and beat until fluffy. Add the eggs, one at a time, and beat to combine after each. Add the vanilla and the applesauce, and beat until combined.
Mix in half of dry ingredients. When nearly combined, add the buttermilk. Mix in the remaining dry ingredients, until fully incorporated. Be careful not to over-mix.
Pour the batter into the prepared cake pan and place in centre of the oven. Bake for 25-30 minutes, until cake is done. Test for doneness by lightly pressing the cake - it should spring back to the touch. Alternatively poke a toothpick into the centre of the cake - if it comes out clean, its done. Remove the cake from the oven and leave to cool in pan for 15 minutes. Remove from pan and leave to cool on wire rack.


Once cool, carefully slice in half and fill with the extra apple sauce.


Ice with cream cheese icing.

Saturday, 12 November 2011

Apple sauce

Adapted from All Recipes and Simply Recipes

Ingredients
4 apples (peeled, cored and chopped)

Slice of lemon peel
1/2 - 3/4 cup water
1/4 cup white sugar
1/4 cup brown sugar
1/2 teaspoon ground cinnamon

Method
In a saucepan, combine apples, lemon peel, water, sugar, and cinnamon. Cover, and cook over medium heat for 15 to 20 minutes, or until apples are soft. Remove lemon peel and allow to cool before mashing with a fork or potato masher. If you want it smoother, use a hand held mixer or pop it in the blender for a few seconds.


Strawberries & cream (and white chocolate....)

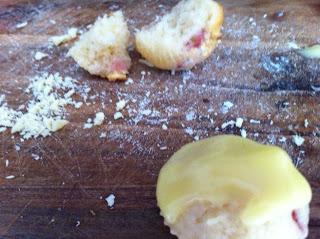
Strawberry and white chocolate baby cakes with white chocolate ganache

Last weeks recipe was based on the delicious combination of strawberries and chocolate. As berries are so good at the moment, I couldn't resist using them again. So... this week the theme is similar, but with white chocolate instead of milk chocolate.


White chocolate isn't really, chocolate, is it. My Dad loves good chocolate - can't stand white chocolate. So I made his by replacing the white chocolate with blueberries and no white chocolate ganache.

Makes about 30 mini cupcakes


Ingredients:

White chocolate ganache
1/3 cup thickened cream
90g white chocolate, chopped into small pieces

Cupcakes (recipe adapted from Exclusively Food)
2 tsps 10ml freshly squeezed lemon juice
1 tsp vanilla bean paste
1 cup low fat milk
1/2 cup rice bran oil
1 large egg
2 cups self-raising flour
2/3 cup caster sugar
130 g white chocolate, chopped into small pieces
200g strawberries


Method:
Chocolate ganache
To make the ganache, put cream in a microwave safe jug and put it in the microwave on medium for one minute. Stir, then return to microwave for another 30 seconds. Remove from microwave and add chocolate, stirring regularly until chocolate is melted and incorporated. Put aside to cool.


Cupcakes
Preheat oven to 190 degrees Celsius. Grease and/or line mini cupcake pans with patty/muffin case.

Place the vanilla, lemon juice, milk, oil and egg in a bowl and whisk to combine. Set aside.

In a large bowl, place flour, sugar and white chocolate in a large bowl. Mix until just combined. Add strawberries and stir.


Fill cupcake pans with batter and place in oven for 10-12 minutes, rotating half way through to ensure even baking. Test for doneness by inserting a toothpick into the centre of a cupcake, if it comes out clean, the cupcakes are done. Remove from oven to cool, before turning out onto a wire rack to cool further.

Once cooled completely, ice them with white chocolate ganache.


Thursday, 3 November 2011

Double chocolate strawberry truffle baby cupcakes

I haven't baked in a while. Last weekend was Melbourne cup weekend, so we had four days off. We had a great day on Derby day, and a lazy Sunday. By Monday I was ready to bake! I wasn't really sure when I started making these how they would turn out, but I had truffle cupcakes in mind and was determined to give it a go. And... everyone likes strawberries dipped in chocolate, right?

I made the chocolate ganache and the strawberry curd a day before making the cupcakes to ensure they had firmed up enough to use.

Makes 24 mini cupcakes

Ingredients:
Truffle centre
Strawberry curd filling (adapted from Baking Bites)
200 grams strawberries, pureed
1/2 cup white sugar
5 tbs cornstarch
4 tbs thicken cream
1/4-1/2 cup icing sugar, sifted. Amount depends on how sweet your strawberries are.

Chocolate truffle filling (Adapted from Simply Recipes)
150g good quality dark chocolate chopped into small pieces
1/3 cup of thickened cream
3/4 teaspoon of vanilla extract
Cupcakes
Half this chocolate cupcake recipe

Method:
Strawberry curd filling
Combine strawberries and sugar in a food processor and blend until very smooth. Add cornstarch and blend again. Strain into a medium saucepan. Over medium heat, cook until it just comes to boil - this shouldn't take long. Stir continuously and cook for about a minute, until the mixture thickens slightly (If it covers the back of a wooden spoon, this is the thickness you want). Pour into a heat proof container and cover the top of it with cling wrap. By having the cling wrap in contact with the curd it will prevent a skin from forming. Leave to cool and thicken.
Chocolate truffle filling
Put cream in a microwave safe bowl and put it in the microwave on medium for one minute. Stir, then return to microwave for another 30 seconds. Remove from microwave and add chocolate, stirring regularly until chocolate is melted and incorporated. Stir it regularly - it should start to look lovely and smooth. Pop in the fridge to cool.

Once both the strawberry curd and chocolate mixture have cooled and thickened, line a plastic container with baking paper and pour the ganache into a smooth layer. Top with the strawberry curd and pop back in the fridge over night.

Cupcakes
Preheat oven to 176 degrees C. Spray 24 mini silicon cupcake moulds and place on a baking tray.

Sift dry ingredients into a mixing bowl. Add eggs, milk, vanilla and oil. Beat ingredients with a mixer for approx two minutes. Occasionally scrape down the sides of the bowl with a rubber spatula to ensure all ingredients are incorporated. Add the boiling water, and beat until just blended. Don't over-mix. 
Make sure you pour the mixture into the liners when they are on the tray that you are using to put them in the oven - due to the boiling water, the mixture is very runny!Bake for 10-15 minutes or until a skewer inserted into the cupcakes comes out clean. Mine took about 12 minutes. Leave in the moulds to cool for a few minutes before turning out onto a wire rack.

To assemble the cupcakes:
15 minutes prior to filling the cupcakes, remove the truffle filling from the fridge.
Use this method to hollow out the top of the cupcake and fill with the truffle filling. You will need approx one teaspoon per cupcake.