Pages

Thursday, 3 November 2011

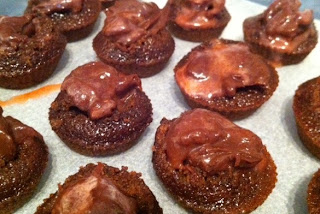
Double chocolate strawberry truffle baby cupcakes

I haven't baked in a while. Last weekend was Melbourne cup weekend, so we had four days off. We had a great day on Derby day, and a lazy Sunday. By Monday I was ready to bake! I wasn't really sure when I started making these how they would turn out, but I had truffle cupcakes in mind and was determined to give it a go. And... everyone likes strawberries dipped in chocolate, right?

I made the chocolate ganache and the strawberry curd a day before making the cupcakes to ensure they had firmed up enough to use.

Makes 24 mini cupcakes

Ingredients:
Truffle centre
Strawberry curd filling (adapted from Baking Bites)
200 grams strawberries, pureed
1/2 cup white sugar
5 tbs cornstarch
4 tbs thicken cream
1/4-1/2 cup icing sugar, sifted. Amount depends on how sweet your strawberries are.

Chocolate truffle filling (Adapted from Simply Recipes)
150g good quality dark chocolate chopped into small pieces
1/3 cup of thickened cream
3/4 teaspoon of vanilla extract
Cupcakes
Half this chocolate cupcake recipe

Method:
Strawberry curd filling
Combine strawberries and sugar in a food processor and blend until very smooth. Add cornstarch and blend again. Strain into a medium saucepan. Over medium heat, cook until it just comes to boil - this shouldn't take long. Stir continuously and cook for about a minute, until the mixture thickens slightly (If it covers the back of a wooden spoon, this is the thickness you want). Pour into a heat proof container and cover the top of it with cling wrap. By having the cling wrap in contact with the curd it will prevent a skin from forming. Leave to cool and thicken.
Chocolate truffle filling
Put cream in a microwave safe bowl and put it in the microwave on medium for one minute. Stir, then return to microwave for another 30 seconds. Remove from microwave and add chocolate, stirring regularly until chocolate is melted and incorporated. Stir it regularly - it should start to look lovely and smooth. Pop in the fridge to cool.

Once both the strawberry curd and chocolate mixture have cooled and thickened, line a plastic container with baking paper and pour the ganache into a smooth layer. Top with the strawberry curd and pop back in the fridge over night.

Cupcakes
Preheat oven to 176 degrees C. Spray 24 mini silicon cupcake moulds and place on a baking tray.

Sift dry ingredients into a mixing bowl. Add eggs, milk, vanilla and oil. Beat ingredients with a mixer for approx two minutes. Occasionally scrape down the sides of the bowl with a rubber spatula to ensure all ingredients are incorporated. Add the boiling water, and beat until just blended. Don't over-mix. 
Make sure you pour the mixture into the liners when they are on the tray that you are using to put them in the oven - due to the boiling water, the mixture is very runny!Bake for 10-15 minutes or until a skewer inserted into the cupcakes comes out clean. Mine took about 12 minutes. Leave in the moulds to cool for a few minutes before turning out onto a wire rack.

To assemble the cupcakes:
15 minutes prior to filling the cupcakes, remove the truffle filling from the fridge.
Use this method to hollow out the top of the cupcake and fill with the truffle filling. You will need approx one teaspoon per cupcake.

Sunday, 23 October 2011

"Muffin top" Banana Cookies two ways

After reading the comments on the Simply Recipes website about these cookies, I was intrigued. They were described by one commenter on the site as Banana Muffin Top "Cookies", which explains them perfectly. Baked until lightly browned, they are slightly crispy on the outside and soft and cake-like in the centre. The banana allows the cookies to be lovely and moist. The reaction that takes place between the banana and baking soda gives the cookies their rise as they bake.


I baked half of them plain and iced them with cream cheese icing. The rest I filled with snickers. Mr X tasted both and said while both were good, he preferred the plain iced ones. That surprised me - I actually had made that flavour combination with my Dad in mind and the 
snickers ones for Mr X to take to work. Ooops!

The original recipe called for more spices and pecans but I chose not to add them. If you want to add the nuts, add them at the end to the whole batter where I added the snickers (1 cup). I also added vanilla bean paste. 


Ingredients:
Cookies

1/2 cup of unsalted butter, room temperature
1 cup of sugar

3/4 tsp vanilla bean paste
1 egg, room temperature
1 cup of mashed bananas (3
 large bananas)
1 teaspoon of baking soda
2 cups of flour
Pinch of salt
1/2 teaspoon of ground cinnamon
Pinch of nutmeg
3/4 cup snickers, chopped

Cream cheese icing
75g cream cheese, softened

30g butter, softened
Heaped cup icing sugar, sifted

Method:
Cookies
Preheat the oven to 176 degrees C. Add the butter and sugar to a bowl and beat the butter and beat until light and fluffy. Add the egg and beat until the mixture is pale and fluffy.

In a bowl, mash the banana and mix in the baking soda, letting it sit for 2 minutes. This is an important step as I mentioned above, so don't skip it.

Add the banana to the butter mixture. Mix flour, salt, and spices together then sift this into the butter and banana mixture. Stir until just incorporated.

Remove half the batter and set aside. With remaining batter, mix in the chopped snickers. Drop heaped tablespoons of batter onto prepared baking tray for big cookies which I did - this makes 20 to 25 cookies. I think next time I would try making them a bit smaller. They do spread a little so space them far enough apart.

Bake for approx 12-18 minutes or until the tops are lovely golden brown (cooking time obviously depends on the size of your cookies - mine took 15 minutes). Turn onto wire racks and allow to cool.

Makes 20 to 25 cookies.


The cookies will keep for a couple of days if you don't want to eat them right way. To help maintain their firm exterior, the advise on the Simply Recipe website was to pop them in a container with the lid not quite on (i.e. not air-tight).


Tuesday, 4 October 2011

Chocolate Brownie Roll-Out Cookies two ways

We are in the process of putting our home up for sale. It is a small, two bedroom unit (i.e. a "shoebox") and we have basically out-grown it. Because weekends are filled with open for inspections (and the house will have to look spotless at all times), I decided to impose a baking ban on myself. So I (sadly) pack up the majority of my baking stuff - cupcake and cake pans, the electric mixer, food processor, rolling pin - basically everything except a set of measuring cups and one mixing bowl. All of it is now stored in boxes at my parents house (including, it seems, half the contents of our house - thanks heaps Mum and Dad!) This baking ban lasted one week - I felt like I was going crazy! So I panicked - and decided that I had just enough equipment at home to make these cookies...if I used a wine bottle to roll them out.I was confident I would have all the ingredients, so I got to work. I realised I didn't have sugar, and I was about 2 tablespoons short of cocoa! Luckily the wonderful Mr X came to the rescue and picked them up from the supermarket on his way home.


The original recipe leaves them plain and un-iced but I decided to top half with chocolate ganache and the remaining half with caramel.


Cookie recipe from Smitten Kitchen

Ingredients:

Cookies
3 cups plain flour
pinch of salt

1/2 teaspoon baking powder
1/2 cup unsalted butter
1/2 cup salted butter, softened
1 1/2 cups white sugar
2 large eggs
1 teaspoon vanilla bean paste
 
2/3 cup unsweetened cocoa

Chocolate ganache

100g dark chocolate, chopped
100g milk chocolate, chopped
1/2 cup thickened cream


Cheats caramel
1 can sweetened condensed milk
2 tbs golden syrup
2 tbs brown sugar


Method:
Cookies
Preheat oven to 176 degrees C. Line baking trays with baking paper. 
Mix flour, salt and baking powder in bowl and set aside. Pop the softened butter, sugar, eggs, vanilla and cocoa in a large bowl and beat to combine (or mix with a spoon, it works fine). Gradually add in the flour, and mix until just combined. The dough should be nice and smooth. Wrap in cling wrap and pop in the fridge for one hour, or roll out dough and cut into shapes and then pop in the fridge. I rolled out the dough immediately and cut into shapes, and this worked well. The dough was really easy to work with - I spread out some baking paper, sprinkled out a little cocoa and shaped the dough into a roll. I placed another piece of baking paper on top, then used a rolling pin wine bottle. I rolled the dough out to a thickness of about 7cm.

I chose three cookie cutters all roughly the same size (small, 3-4 cm wide). Cut out the cookies and transfer to the baking tray. They don't spread during baking so they can be placed relatively close together.


Bake 6 to 10 minutes (baking time will depend on thickness of cookies and size of your cookie cutters. Watch them closely during last stages of baking - you want the edges firm and the centres still a bit soft and puffy (this puffiness settles on cooling.

Transfer to a wire rack to cool.

Chocolate ganache
To make the ganache, put cream in a microwave safe jug and put it in the microwave on medium for one minute. Stir, then return to microwave for another 30 seconds. Remove from microwave and add chocolate, stirring regularly until chocolate is melted and incorporated. Put aside to cool.


Cheats caramel filling
To make the cheats caramel, put sweetened condensed milk in the microwave on medium for four minutes on medium, stirring every few minutes. Return to microwave and reduce heat to medium/low for a further 6 to 8 minutes, stirring regularly. It will start to thicken and the colour will become deeper. Remove from microwave, add golden syrup and mix well. Add brown sugar and mix well. Return to microwave on med/low for a minute. Stir again and set aside to cool and thicken.


Assembling the cookies
Dip a cookie in the ganache, coating it evenly. Lightly tap off excess. Repeat with half the remaining cookies. Leave to dry.


Put some of the cheats caramel into a piping bag and pipe a dollop onto a cookie. Repeat with remaining cookies.

Sunday, 2 October 2011

Apple crumble slice for Dad

Dad has relatively simple tastes when it comes to baked goods. Chocolate (no white chocolate), banana or apple cinnamon.

This apple crumble slice can be served hot or cold. It has a buttery biscuit base, apple and cinnamon filling, with a brown sugar and cinnamon crumble topping. It is definitely not a pretty slice - the topping making it a little messy to serve, but it smelt great baking in the oven.

Ingredients:

Apple filling
3 apples, peeled, cored and finely chopped
1/2 cup firmly packed brown sugar
1 tablespoon cinnamon
2 tablespoons cornflour
4-5 tablespoons butter


Base
1 1/2 cups plain flour
1/3 cup sugar
Pinch of salt
1/2 cup butter


Crumble topping
1/2 cup firmly packed brown sugar
1/3 cup plain flour
1/4 cup unsalted butter
1 tsp cinnamon


Method:
Melt butter in pan and add apples, stirring for two minutes. Add sugar, stir until dissolved. Add cinnamon and stir thoroughly, then add corn flour to thicken. Cook for a further five to seven minutes. You want to have the apples just cooked - not soft and mushy. Keep warm while you make the base. you want to add this to the base straight from the oven.

Preheat the oven to 176 degrees C. Grease and line a 20 x 20 cm cake pan. Cut the baking paper bigger than the baking pan so you have some overhang for easy removal of the slice after baking.


For the base, place the flour, salt and sugar in a large bowl and whisk to combine. Add the butter and use an electric beater on low to mix until it resembles sandy crumbs. Use your hands if it's easier!


Tip the mixture into the baking pan and use your fingers to press the mixture evenly into the bottom of the pan. Pop in the oven and bake for 16-20 minutes, until golden brown at the edges. Watch closely after 15 minutes, but mine took closer to 20.


While the base is baking, get the crumble mixture ready. Mix butter, sugar, flour and cinnamon in a small bowl. You want to pour the mixture onto the base while still warm from the oven, so have it ready! Spread apple evenly over base. Sprinkle the crumble on top.


Return to the oven and bake for another 10-15 minutes, until crumble is golden. Leave to cool before slicing.


Sunday, 25 September 2011

Chocolate layer cake with chocolate ganache

I must admit I was nervous about the addition of coffee into the cake. Love them both individually, but not combined. I did some research and found that apparently the coffee deepens the chocolate flavour, resulting in a delicious chocolate flavour with no coffee taste. I was skeptical. Mr X added to my anxiety when he tasted the raw cake batter. "Hmmm... is there coffee in the cake? That's all I can taste!". Uh-oh. But popped the cake in the oven anyway. Mr X tasted the cake once baked and changed his mind about the coffee taste. I got the thumbs up. Phew!

The oil is used instead of butter leaving the cake lovely and moist - it also stays fresh longer without going dry.

Ingredients:
Cake

3 cups plain flour
2 1/2 cups sugar
1 tbsp + 1 tsp baking soda
Pinch salt
1 cup unsweetened cocoa powder (sifted)
1 1/3 cups rice bran oil
1 1/2 cups buttermilk - well shaken
3 large eggs
1 1/2 cups freshly brewed hot coffee (I used two shots of long black from our coffee machine topped up to 1 1/2 cups with warm water)
1 1/4 tsp vanilla bean paste

Ganache (enough to fill cake between the layers and to ice the cake) 
250 grams dark chocolate
100 grams of milk chocolate
3/4 cups thickened cream

Method:
Preheat the oven to 176 degrees C degrees. Grease and line two 20cm round cake pans with baking paper.

Place flour, sugar, baking soda, salt and cocoa powder in a large mixing bowl and whisk to combine. Add oil and buttermilk. Add the eggs one at a time, beating the mixture continuously on low with an electric beater. Slowly pour hot coffee down the side of the bowl and into the mixture, continuing to mix on low speed. Add vanilla and mix until batter is smooth. Divide into pans. Pop in oven and bake until a toothpick comes out with moist crumbs, about 30-35 minutes. Rotate half way through baking. Mine took 35 minutes to bake. Let cool in pans for at least 20 minutes.

While cakes are baking, pop the cream in a microwave on medium head for one minute, being careful not to burn it. Add chocolate to cream and mix, allowing the chocolate to melt. Continue to stir until fully incorporated. It looks so smooth and shiny - you will not be able to risk tasting it! Delicious!  Set aside to cool and thicken at room temperature, stirring occasionally.

Once baked and cooled, carefully remove cakes from pans. Place one layer of cake on a serving plate. If the cakes are a little uneven onto, carefully trim the tops with a serrated knife. Place some of ganache in the middle of the cake and smooth it out towards the edges using a spatula. Repeat the process with the second cake, before placing the untrimmed side down on the top of the first cake, forming two layers. Press down gently.

Spoon more ganache on the top and smooth it around the sides, adding more ganache as needed to cover the entire cake. Leave it to set for a few minutes (if pressed for time, put it in the fridge for 10 minutes) then smooth on another layer.
Another nice option would be to put caramel in between the layers before covering with ganache.

Sunday, 11 September 2011

Lemon bars for Mum

Happy birthday Mum...
Mums birthday was on September 2nd.She loves lemon tart, but unfortunately I don't have a tart baking pan. I wasn't quite game enough to make a lemon tart without the pan, as I really didn't want to fail miserably. It was Mum's birthday after all!
These lemon bars were baked in a square cake pan and essentially tastes the same as a lemon tart. This recipe calls for a lot of lemon juice - the result is a nice, strong lemon flavour. The base is nice and thick and isn't made soggy by the filling.


Lemon bars (Recipe from Baking Bites)


Ingredients:
Base
1 1/2 cups plain flour
Pinch of salt
1/3 cup sugar
1/2 cup unsalted butter, room temperature


Filling
4 eggs
1 1/3 cup sugar
1 cup freshly squeezed lemon juice, strained


Method:
Preheat the oven to 176 degrees C. Grease and line a 20 x 20 cm cake pan. I find it easy to use baking paper with a bit of overhang (have the baking paper extend up a few cm over the cake pan to make it easy to remove the bar without breaking after baking).
For the base, place the flour, salt and sugar in a large bowl and whisk to combine. Add the butter and use an electric beater on low to mix until it resembles sandy crumbs. I found it easier to rub the butter a little into the flour with my fingers to achieve this after using the beater for a few minutes, but maybe that was me being a little impatient!
Tip the mixture into the prepared pan. Using your fingers press the mixture evenly into the base of the pan, extending to the edges and corners.
Pop in the oven and bake for 16-20 minutes, until golden brown at the edges. Watch closely after 15 minutes, but mine took closer to 20.
While the base is baking, whisk together the filling ingredients until incorporated. You want to pour the mixture onto the base while still warn from the oven, so have it ready!
Take the base from oven and pour filling in carefully before popping back in the oven for 20-25 minutes, or until the filling is set and doesn't wobble. 
Note - I used a silicon cake pan so I made sure I had it on an oven tray before pouring the filling in - otherwise it would have been very hard to get into the oven!


While the bars taste good on the day of eating, if you leave them overnight (or even a few days) in the fridge, the lemon flavour develops and the bars get better. 

Saturday, 27 August 2011

Chocolate & strawberry jam crumble bar

I saw this on the blog Sugar crafter a week or so ago and was intrigued. I added a bit more vanilla, changed up the chocolate chips slightly and added less jam, other than that, the recipe is essentially the same. Also changed the pan as didn't have the same size as the one she used.

Now that I have made this, several variations come to mind that I would like to try.
* Replace chocolate/condensed milk with apple cinnamon filling
* Replace chocolate/condensed milk with caramel, add apple filling
* Replace jam with peanut butter
* Replace the crust with an Oreo or tim tam cookie crumb base
* Replace the crust with the Nestle toll house cookie dough
* Remove chocolate/condensed milk, keep jam, remove chocolate chips, add a strawberry icing. Wow. That brings back memories of a fabulous bar I used to eat all the time growing up in New Zealand.

Anyway.... here is the recipe for the Chocolate & strawberry jam crumble bar

Ingredients:
Base

1 cup unsalted butter, softened
1 tsp vanilla bean paste
2 cups plain flour
1/4 cup firmly packed brown sugar

Filling
1 cup chocolate chunks
1 can (14 oz) condensed milk
1/2 tsp vanilla bean paste
1/2 cup strawberry jam

Topping
1/3 of base mixture
1 cup chocolate chunks (I used Cadbury top deck)

Method:
Preheat the oven to 176 degrees C and grease and line a 20 x 20 cm square cake pan. I like to have the baking paper overhang (come up further than the top of the cake pan) so once baked, the bar is easy to remove from the pan without breaking.
The original recipe called for a larger pan, so I also greased and lined a 6 capacity cupcake pan. Turns out this was just right for the quantity of mixture.

In a large mixing bowl, beat the butter and vanilla until creamy. In a seperate bowl, sift in the flour and add the brown sugar. Mix to combine.

Add flour mixture to the butter mixture and beat to combine. Remove 1/3 of the mixture and set aside to use for the crumble topping. With the remaining 2/3 of the dough, press 3/4 into the prepared pan, and the rest divide amongst the cupcake liners.

Place the cake pan and the cupcake pan into the oven and bake for 5 minutes. Remove the cupcake pan, and bake the cake pan for another 3-4 minutes, or until crust is a lovely light golden colour.

For the centre, place the chocolate into a microwave safe bowl. I started off by melting the chocolate in short bursts on medium in the microwave. Make sure you check on it and stir frequently - you don’t want to burn it! When chocolate was ¾ melted I added the condensed milk, and continued microwaving and stirring until fully melted and mixed. Add the vanilla bean paste, and stir to combine. Set aside to cool for a few minutes.
Spread jam over the cooled base (in cake and cupcake pans). Pour the chocolate mixture over the jam. Sprinkle remaining dough and top deck chocolate chunks over top of the cake pan and cupcakes.

Place cake pan and cupcake pan in oven, and bake for 10 minutes. Remove cupcake pan, and continue baking cake pan for a further 10 minutes. Let cool before attempting to slice - otherwise you will end up with a crumbly mess. Trust me. Slice, then eat.


Baby banana cakes with cream cheese icing

I can't believe that my little brother turned 26 this month. I feel like time is flying by at a million miles an hour. He says he hates birthdays because he feels old .... how does he think I feel when he says that? Older.


He doesn't like us to make a fuss on his birthday, but I couldn't resist baking something for him. He is a little bit fussy (but getting better with age), so I made plain, un-iced baby banana cakes for him. Mr X took some to work with him, and I topped those with lemon cream cheese icing.


I used the Exclusively Food banana cake recipe, but replaced some of the white sugar with brown sugar.


Makes 16.
Ingredients:
125g unsalted butter, softened
1 cup white sugar 
1/2 cup firmly packed brown sugar
1 cup plus 2 tablespoons of very ripe, mashed banana (approx 3 large bananas)
1 tsp vanilla bean paste
3/4 teaspoon ground cinnamon (optional, I didn't use it this time)
2 large eggs
1/3 cup + 1 tablespoon buttermilk
1 1/2 cups self-raising flour
1/2 teaspoon bicarbonate of soda


Method:
Preheat oven to 160 degrees C, and grease and line cupcake pans - enough for 14-16 cupcakes, depending on how full you make them.

Place butter, sugar, banana, vanilla and eggs in a food processor and pulse to combine for approximately two minutes. Add butter milk and pulse to combine.

Sift flour and bicarb soda into a bowl. Add this to the blender and pulse again until just combined, scraping down the sides if required.

Pour batter into prepared liners. I filled mine 2/3 full. I found filling them this amount resulted in a nice, very slightly domed cupcake.

The recipe can easily be doubled, however, in my experience you may find you can't put all the ingredients in the food processor at once! Just mix it up in a bowl instead.

Cream cheese icing
Ingredients:
100g cream cheese, softened
50g butter, softened
2  cups icing sugar
1 1/2 teaspoons lemon juice

Method:
Beat the cream cheese and butter in a bowl until light and creamy, about 2 minutes. Sift in the icing sugar and beat well. 


Sunday, 14 August 2011

Jam “doughnut” cupcakes and Lemon curd “doughnut” cupcakes

"Doughnut" cupcakes two ways - Jam “doughnut” cupcakes and Lemon curd “doughnut” cupcakes

Following on from my apple doughnut cupcake post a while ago, I started thinking about other possible combinations.

I started off with the very vanilla cupcakes from a recent post. I doubled the recipe this time though so I would have enough to take to a friends place for dessert and have some left for Mr X to take into work (which seems to be routine these days!).

I decided on two types - lemon curd and jam filled. Lemon curd paired well with the cupcake recipe because the cupcakes require four egg whites, and the lemon curd needed four egg yolks. I decided the combination was meant to be! I also made jam filled ones because Mr X requested them.

Ingredients:
Cupcake recipe here (double batch) - makes approx 28 cupcakes

Lemon “doughnut” cupcakes

Ingredients:
14 “very vanilla” cupcakes

Lemon curd filling
Recipe here

Drizzle topping (adapted from bbcgoodfood.com)
Juice of 1 1/2 lemons (freshly squeezed, strained)
43 grams caster sugar

Method:

Bake cupcakes. Leave in pan to cool for 10 minutes before turing out onto wire rack. Hollow out the top of each cupcake (instructions here)
Put caster sugar in a small bowl and add lemon juice to it. Mix to combine. Drizzle over cupcakes while still warm.

Fill the cupcakes with lemon curd using this method.


Jam "doughnut" cupcakes
Ingredients:
14 “very vanilla” cupcakes*
* add 3/4 tsp cinnamon and 1/4 tsp nutmeg to batter

Jam filling
Approx 14 tsp good quality strawberry jam

Sugar coating
1/2 cup caster sugar
1/2 tsp cinnamon
5 tbs butter, melted
Method:
Bake cupcakes. Leave in pan to cool for 10 minutes before turing out onto wire rack. Hollow out the top of each cupcake (instructions here)

Melt a few tbs butter in the microwave safe bowl. Brush cupcakes lightly with melted butter and roll in sugar.

Fill the cupcakes with jam using this method. 

I spent a lazy day at home with Mr X and our dog, Ari Gold. Ari decided to "help" me update my blog. Thanks Ari!

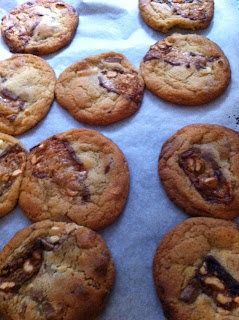
Cookies 2 ways - Snickers filled and M&M

Mr X was at the footy yesterday, so when I had done the boring stuff like supermarket shopping, I went into the kitchen to bake. I had been looking forward to it all week. Being back at work after our holiday, I needed to do something to de-stress!


I started off with the Nestle Toll House cookies I made a while back. While the dough was chilling in the fridge I cut up four mini snickers and opened a bag of M&M's.


I then divided the dough in half, and popped one half back in the fridge so it would keep firming up.


M&M cookies
Ingredients:
1/2 quantity of Nestle Toll House cookie dough
Approximately 80 M&M's (four for each cookie)


Method:
Preheat the oven to 195 degrees C. Line two baking trays with baking paper.


Roll heaped tablespoons into balls and place onto prepared cookie sheet approx 6 cms apart.

After they have been in the oven for four minutes (to allow them to spread), quickly pull them out of the oven and pop some M&M's on top of each cooke (I used 4 per cookie, but you can always use more), rotate the tray and put them back in the oven for the remainder of the baking time. 

Bake for 8 to 11 minutes (mine took 8 minutes) or until golden brown. Cool on baking sheets for 2 minutes; transfer to wire racks to cool completely.

Makes 16 - 20 cookies depending on size.

Snickers centred cookies

Ingredients:
1/2 quantity of Nestle Toll House cookie dough
4 mini snickers, thinly chopped (2 pieces per cookie - one to insert into centre, one for top of the cookie)*

Roll a heaped tablespoon of dough into a ball and make a well in the centre. Insert snickers piece and carefully cover it up with cookie dough. Place on baking tray and top with another piece of snickers. Repeat with remaining dough.


Bake for 8 to 11 minutes (mine took 8 minutes) or until golden brown. Cool on baking sheets for 2 minutes; transfer to wire racks to cool completely.

Makes 16 - 20 cookies depending on size.

* While pleased with the outcome of the cookies, I think next time I would insert a larger chunk into the centre and top with at least two snickers pieces for a more intense snickers taste!


Sunday, 7 August 2011

Very vanilla cupcakes with vanilla icing and strawberry filling


We just got back from an overseas holiday and I haven't baked in nearly 5 weeks! Despite the jet lag, I really wanted to get back into the kitchen and bake something.

Cupcakes (Recipe from Simply Recipes)

Ingredients:
1 1/2 cups + 2 tablespoons plain flour
1/4 teaspoon salt
1 1/4 teaspoons baking powder
1/2 cup room unsalted butter (room temperature)
1 cup white sugar
1 egg + 2 egg whites (keep seperate)
1/2 cup whole milk (room temperature)
1/4 cup sour cream
1 1/2 teaspoons of vanilla extract
1 tsp vanilla bean paste

Icing and filling

Icing:
2 1/2 cups icing sugar
2/3 cups unsalted butter
1 tsp vanilla bean paste
4 tbs milk

Strawberry filling:
1/3 cup vanilla icing
2 large strawberries, mashed
4 tsp strawberry jam

Method:
Preheat the oven to 176 degrees celsius. Grease and line a 12 capacity cupcake pan.

Beat the butter on medium for 3 minutes before adding the sugar. Beat for a further 3 minutes to combine. Add the egg then beat for 30 seconds. Add egg yolks one at a time, beating in between.

Sift the flour, baking powder and salt into a bowl. In another bowl, add the milk, vanilla bean paste, vanilla extract and the sour cream in a bowl and mix together well.

Add the milk/vanilla.sour cream and flour mixture to the butter/sugar alternatively, scraping down the sides of the bowl and mixing in between. Make sure you start and end with the flour mix.

Make sure you don't over beat the mixture.

Divide the mixture evenly between cupcake liners and bake for 18-22 minutes, until a toothpick comes out clean.

They smelt lovely when they were baking!


To make the icing and filling

Icing:
Place butter in mixing bowl and beat for two minutes. Sift in icing sugar and beat to combine. Add vanilla bean paste. Add the milk, one tbs at a time, beating mixture in between until reach desired consistency.

Strawberry filling:
1/3 cup vanilla icing
2 large strawberries, mashed
4 tsp strawberry jam

Mix until smooth. 

Click here for instructions on how to fill cupcakes


Friday, 5 August 2011

Chocolate caramel cupcakes


Chocolate anything is always popular, and I love caramel!
Makes 24
Ingredients:
1 cup white sugar
1 cup brown sugar
3/4 cup cocoa
1 3/4 cup plain flour
1 1/2 tsp baking powder
1 1/2 tsp baking soda
1/2 tsp salt
2 eggs
1 cup milk
1/2 cup rice bran oil
1 1/2 tsp vanilla bean paste
1 cup boiling water

Caramel (for filling and drizzling)
1/4 cup butter
1/2 cup firmly packed brown sugar
1/8 cup milk
3/4 tsp vanilla extract

Chocolate icing
1 cup unsalted butter (room temperature)
4 cups icing sugar, sifted
1 1/2 cup cocoa, sifted
1/2 tsp vanilla bean paste

12 tbs milk

Method:
Cupcakes

Preheat oven to 176 degrees C. Spray and line pans with 24 cupcake liners.

Sift dry ingredients into a mixing bowl. Add eggs, milk, vanilla and oil. Beat ingredients with a mixer for approx two minutes. Occasionally scrape down the sides of the bowl with a rubber spatula to ensure all ingredients are incorporated. Add the boiling water, and beat until just blended. Don't over-mix.
Due to the boiling water, the batter is very runny. The easiest way to fill the cupcake pans is by pouring the batter into the pans using a jug. Pour evenly into prepared liners.
Bake for 20 to 25 minutes or until a skewer inserted into the cupcakes comes out clean. Mine took about 22 minutes. Leave in the pan to cool for a few minutes before turning out onto a wire rack to cool further.


Caramel sauce
Over medium heat, melt butter in a small sauce pan. Allow to simmer, then add in the brown sugar, stirring, and bring to boil. Then lower heat and stir until sugar is dissolved (should take about a minute). Stir in milk, bring to boil, then remove from heat and stir in the vanilla.

Pop in the fridge to cool down and thicken while you make the chocolate icing.

Click here  
for instructions on how to fill the cupcakes


Chocolate icing
Beat the butter in a mixing bowl for three minutes, add vanilla bean paste and beat. Add sugar and beat until light and fluffy. Add milk a tbs or two at a time and beat, until you reach your desired consistency.


Pipe icing onto cupcakes and drizzle with caramel sauce to finish.